Category: Automation

  • A Ready At heat-up planner for my Balboa spa with ESPHome

    A Ready At heat-up planner for my Balboa spa with ESPHome

    “I want to get in at half seven” – and my Balboa spa, running ESPHome, works out when to start heating.

    A spa takes hours to heat up, often around 20 minutes for every half a degree. To have mine ready when I want it, I either left it heating all day or guessed when to switch it on. So I added a Ready At planner to my spa’s ESPHome setup. You tell it the time you want to get in, and it works out when to start heating. It also learns how quickly your spa heats up, so it gets more accurate over time.

    It runs on the ESP32 connected to the spa, so it carries on even if Home Assistant is down. Everything shows up in Home Assistant automatically. I’ve published the full config and a step-by-step guide on GitHub.
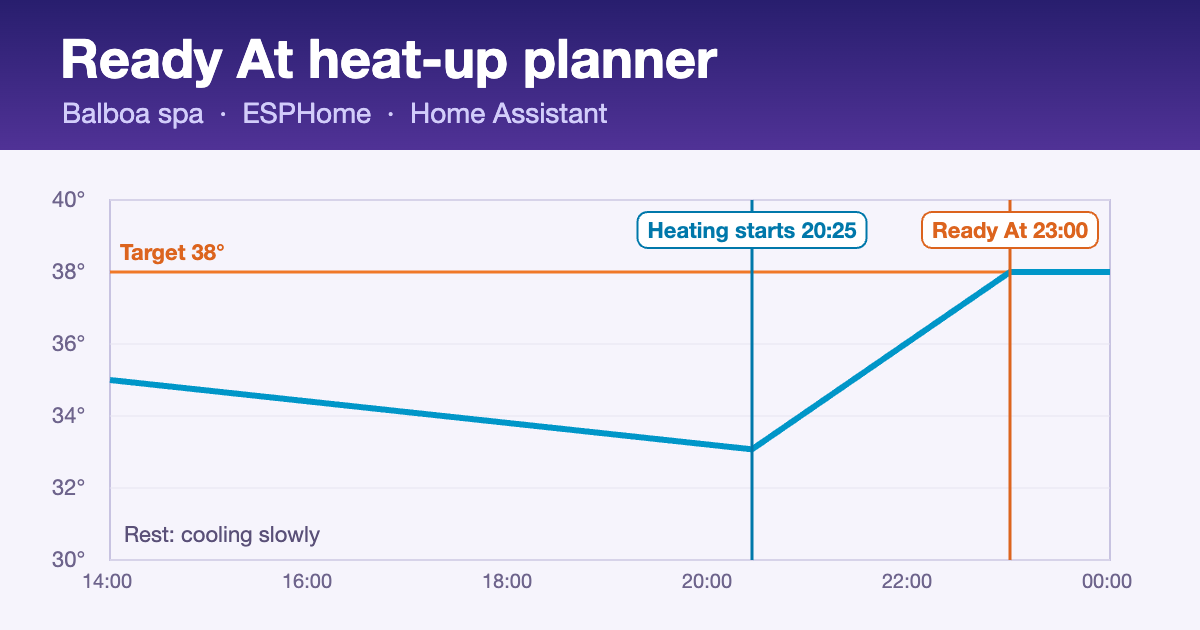
    Balboa spa ESPHome Ready At planner: water temperature rising to 38°C in time for 23:00
    The planner lets the spa rest, then starts heating just in time.

    Built on Brian Feucht’s esphome-balboa-spa

    None of this would be possible without esphome-balboa-spa by Brian Feucht (see his project on GitHub). It’s the ESPHome component that talks to Balboa spa controllers and provides the thermostat, jets, lights, filter cycles, fault log, reminders and more. My project is just a configuration that sits on top of his work. If you have a Balboa spa, his project is the place to start: please give it a star and read his README. His component in turn builds on the original UART reader by Dakoriki.

    Why the timing is tricky

    Balboa spas have two heat modes, and esphome-balboa-spa maps them onto the Home Assistant thermostat:

    Spa settingIn Home AssistantWhat it does
    ReadyMode: HeatHeats whenever the water drops below the set temperature
    RestMode: OffOnly heats during filter cycles. “Off” doesn’t mean the spa is off.
    High rangePreset: HomeThe higher temperature range (up to 40°C)
    Low rangePreset: EcoThe lower range, with its own set temperature

    Rest mode saves energy, but in Rest the spa only measures the water while its pump is running, so the temperature you see can be hours old. That makes it hard to know how long a heat-up will take.

    What the Balboa spa ESPHome planner does

    • Works out the start time from the water temperature, the target and the learned heat-up rate, and switches from Rest to Ready at the right moment.
    • Takes a fresh reading first. When you switch the schedule on, it puts the spa in Ready for a minute or two so the pump runs, reads the real water temperature, then goes back to Rest.
    • Learns your spa. After every heat-up of an hour or more it updates its “minutes per 0.5°C”, blending each new run in so it follows the seasons.
    • Shows its working. A “Last Heat-up” sensor reports each run, for example: 31.0 to 38.5°C in 4h 53m, 19.5 min per 0.5°C, 24 Oct 05:29 (learned).
    • Recalculates straight away when you change the target temperature or the Ready At time.
    • Repeats every day until you switch it off, and can put the spa back into Rest a few hours after you’re done.

    How it works it out

    Between readings, the planner takes the last water temperature it trusts and subtracts an allowance for cooling. Then:

    half-degrees short = (target − estimated temperature) ÷ 0.5, rounded up
    time needed       = half-degrees short × minutes per 0.5°C + margin
    heating starts at = Ready At − time needed

    For example, 34.5°C water heating to 38°C is 7 half-degrees. At 20 minutes each plus a 15-minute margin, that’s 2 hours 35 minutes, so for 23:00 it starts heating at 20:25. If you set a time too soon for a full heat-up, it starts straight away and gets as close as it can.

    Every option explained

    Controls

    SettingWhat it does
    Ready AtThe time you want to get in, 24-hour, e.g. 19:30. Changing it re-plans immediately.
    Ready At ScheduleTurns the planner on or off. Switching it on runs the fresh temperature check first.

    Settings

    SettingDefaultWhat it does
    Heat-up Minutes per 0.5°C20 minHow long your spa takes to raise the water half a degree. Your starting guess; it updates itself after every heat-up of an hour or more.
    Cool-down °C per Hour0.3How fast the water is assumed to cool while resting. Raise it in cold weather, lower it if the spa is ready too early.
    Ready At Margin15 minExtra time added to every heat-up, so it’s ready a little early rather than late.
    Back to Rest After0 hHours after your Ready At time to switch back to Rest. 0 means stay in Ready.

    What it tells you

    SensorWhat it shows
    Ready At StatusWhat it’s doing now, e.g. “Will heat from 20:25”, “Checking water temperature…”, “Heating, ready by 23:00”, “Up to temperature”.
    Heating Starts AtThe planned start time.
    Heat-up Time NeededHow long the next heat-up should take, including the margin.
    Last Heat-upThe last heating run: temperatures, time taken, rate measured, and whether it was long enough to learn from.

    Everything else

    The rest of the config is esphome-balboa-spa’s own features, set up and named consistently: the thermostat (Rest/Ready and High/Low range), jets with Off/Low/High speed, lights, blower, status sensors (heater, circulation pump, rest mode, high range, connected), filter 1 and 2 start times and durations, Disable Filter 2, the spa clock with Sync, the fault log and reminders with Clear. The GitHub guide lists every option, including Brian’s extra jets, second light, filter 2 switch and water heater alternative, and which ones you can leave out. His README is the definitive reference for those.

    Getting started with ESPHome on your Balboa spa

    1. You’ll need a Balboa spa, an ESP32 wired to the spa’s control board via RS-485 (I use a Lolin S2 Mini), and ESPHome, ideally the ESPHome Builder add-on in Home Assistant. For wiring, follow Brian’s project.
    2. Copy spa.yaml from my GitHub repository into a new ESPHome device and add your Wi-Fi details and keys to ESPHome’s Secrets.
    3. Check the board, pins, temperature scale (C or F) and time zone, and remove anything your spa doesn’t have.
    4. Install it, accept the device in Home Assistant, set Ready At and switch on Ready At Schedule.

    The guide also covers the status messages, the full logic, Home Assistant automation examples and a couple of gotchas I hit along the way.

    Get the Balboa spa ESPHome config

    Everything is free on GitHub under the same BSD licence as esphome-balboa-spa: the full config, a secrets template and the complete guide.

    More home automation on Dean’s Workbench: play your own audio stream on Amazon Echo, or fix your music tags with PowerShell.

    Not affiliated with or endorsed by Balboa Water Group. “Balboa” is only used to describe compatible equipment.
  • Dino’s Discogs Tagger – fixing my music tags with PowerShell

    My music collection is mostly FLAC rips, and over the years the tags have become a mess. Some albums have no artwork, and genres often just say “Other”. Years tend to be the date of a remaster rather than when the song came out. On top of that, the file names come in half a dozen different styles. Fixing all that by hand wasn’t going to happen. So I wrote Dino’s Discogs Tagger, a single PowerShell script that looks every album up online and then re-tags and renames the files for me.

    The script is also on GitHub, where you can read the code, download it or keep up with changes: github.com/axelthefatcat/dinos-discogs-tagger.

    What it does

    You point it at a folder – a single album, or a whole drive of album folders – and for every folder containing .flac or .mp3 files it:

    • finds the album on Discogs,
    • writes clean tags: title, artist, album artist, album, track and disc numbers (always two digits – 01, 02…) with totals,
    • puts the Discogs genres in the Genre tag and the Discogs styles in the Comment (plus a STYLE tag),
    • sets a single four-digit year – the year the track was first released, not the year of the CD I happen to own,
    • embeds the front cover and a picture of the artist,
    • adds the label, catalogue number and Discogs release ID for reference,
    • and renames each file to a consistent pattern: 01.01 - Billy Idol - Rebel Yell.flac (disc.track – artist – title).

    How the Discogs tagger works

    1. Working out what the album is

    The script first reads whatever tags are already in the files (artist, album, titles, track numbers). If there aren’t any, it falls back to the folder name (Artist - Album) and the numbers at the start of the file names. That gives it something to search Discogs with.

    2. Only offering releases that actually fit

    Discogs lists every pressing of an album separately, and they often have different track lists. So rather than just showing the search results, the script opens each one. It then only offers releases that have the same number of tracks as the folder, where the track titles match the ones in the files. Matching ignores case, punctuation and bracketed extras like “(Remastered)”. Each option shows how well it fits, e.g. [11 tracks, 11/11 titles match].

    Next, you pick one (Enter takes the first). Alternatively, paste a Discogs release URL if you already know the right one, or type a different search. If nothing matched, press A to see every result. Before it writes anything, the script shows a table of old and new file names, plus the year it found for every track. Finally, it asks you to confirm.

    3. Getting the right year

    This was the fiddly part. A “Greatest Hits” CD from 1988 shouldn’t make every song on it look like it came out in 1988. Instead, for each track the script asks MusicBrainz for the recordings of that song by that artist. It then takes the earliest release date. Along the way, it ignores live, demo and remix versions (unless your track is one). It also prefers recordings of a similar length, so album versions and single edits don’t get mixed up.

    For normal studio albums it cross-checks against the Discogs “master” year (the album’s first release) and uses whichever is earlier. For compilations, however, it relies on MusicBrainz only. The preview shows CHECK on any track where the two sources disagree by more than a year, and NOT FOUND on any it couldn’t find. That way, you can spot the odd ones before applying.

    4. Writing the tags – with no extra software

    I wanted this to run on a locked-down Windows PC with nothing but the built-in PowerShell 5.1. As a result, there are no libraries or tools to install. The script reads and writes the tag formats itself:

    • FLAC – rebuilds the Vorbis comment and PICTURE metadata blocks (picture type 3 = front cover, type 8 = artist) and copies the audio across untouched.
    • MP3 – writes an ID3v2.3 tag (TIT2, TPE1, TRCK, TYER, TCON, COMM, APIC and so on).

    The script writes each file to a temporary copy first and only swaps it in once it’s complete. Therefore, a failure part-way through doesn’t damage the original. Tags it doesn’t manage, such as ReplayGain values, stay as they were.

    It also behaves itself with the online services. For example, it keeps Discogs requests under their 60-a-minute limit and MusicBrainz requests under one a second. In addition, it downloads each artist picture only once.

    Using it

    1. Download the zip above and extract Update-MusicTags.ps1.
    2. Get a free Discogs personal access token: log in at discogs.com/settings/developers and click Generate new token. The script asks for it the first time and saves it in %APPDATA%\DinosDiscogsTagger.
    3. Run it – a folder picker pops up:
    powershell -ExecutionPolicy Bypass -File .\Update-MusicTags.ps1

    I’d recommend a dry run on a copy of one album first – -Preview shows exactly what would change without touching anything:

    .\Update-MusicTags.ps1 -Path "D:\Music\Billy Idol\Idol Songs" -Preview

    Options

    OptionWhat it does
    -PathFolder to process (skips the folder picker)
    -PreviewShow the plan, change nothing
    -AutoNo questions – takes the first fully matching release, skips albums with no match
    -NoRenameUpdate tags but keep the existing file names
    -NoRecurseOnly the selected folder, not its sub-folders
    -SaveFolderArtAlso save cover.jpg in each album folder
    -FileNameFormatChange the naming pattern – default {disc}.{track} - {artist} - {title}; also {album}, {albumartist}, {year}

    Good to know

    • Checking every candidate release takes about a second each, so the first list for an album takes around 30 seconds. Choosing a different release afterwards is instant.
    • The year lookup adds roughly a second per track because of MusicBrainz’s rate limit.
    • Some years will differ from what’s printed on the CD – that’s deliberate. Rebel Yell, for example, comes out as 1983, when the song was first released.
    • As with anything that rewrites files in bulk: keep a backup of your music before running it over the whole collection.
  • Play your own audio stream on Amazon Echo

    Play your own audio stream on Amazon Echo

    “Alexa, open home radio” – and your own audio stream plays on Amazon Echo.

    I wanted to play my own audio stream on Amazon Echo speakers around the house. That could be my own radio station, a media server or anything else on my home network that streams MP3. However, Alexa can’t just play a local address. So I worked out a way round it, using a tiny Alexa skill I wrote myself and my Synology NAS. I’ve also written the whole thing up as a free step-by-step guide on GitHub, with the skill code ready to copy.

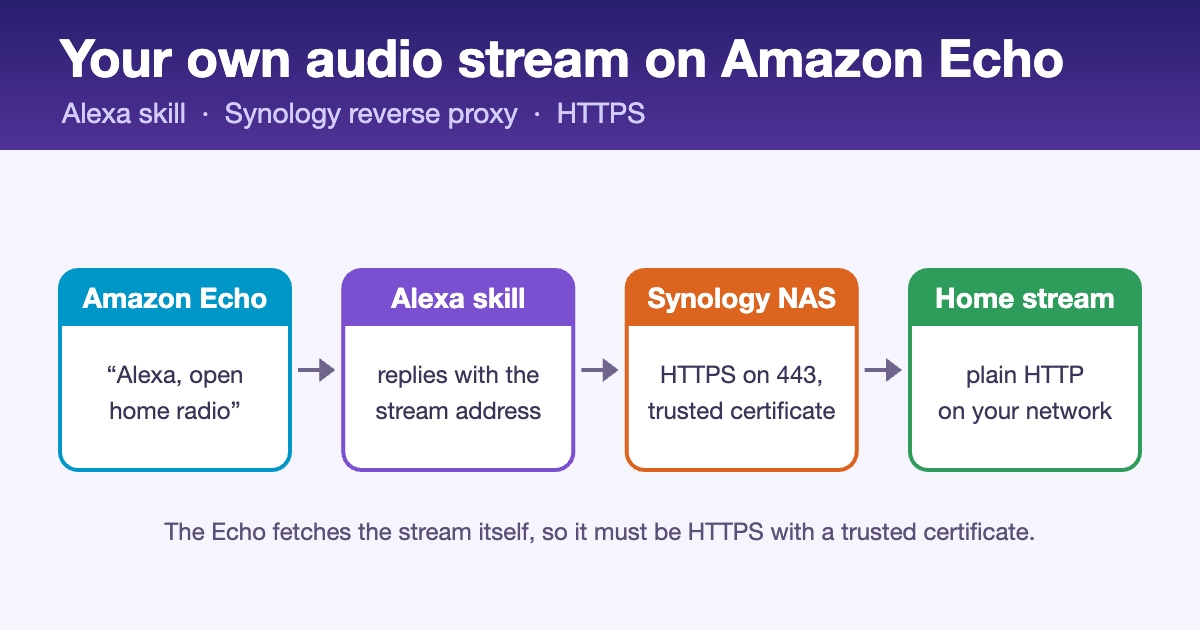
    How your own audio stream reaches Amazon Echo: Echo, Alexa skill, Synology NAS over HTTPS, home stream
    How the stream gets from your network to the Echo.

    Why an audio stream on Amazon Echo isn’t simple

    When an Echo plays audio from a skill, it fetches the stream itself, straight from the address the skill gives it. However, Alexa is fussy about that address. It must be:

    • HTTPS on port 443, with a properly trusted certificate (self-signed won’t do)
    • reachable from the internet, not just your home Wi-Fi
    • in a format it understands: MP3, AAC/MP4, HLS, PLS or M3U

    Unfortunately, most home stream sources are plain HTTP on an odd port like 8000, so they fail all three tests. That’s where the Synology comes in.

    How the audio stream reaches your Amazon Echo

    1. You say “Alexa, open home radio”.
    2. Your Alexa skill replies with the stream’s secure address, e.g. https://radio.yourname.synology.me/stream?key=…
    3. The Echo requests that address from your Synology NAS over HTTPS (port 443, Let’s Encrypt certificate).
    4. The Synology’s reverse proxy fetches the audio from your stream source on the home network over plain HTTP (e.g. http://192.168.1.50:8000) and passes it back to the Echo.
    • The Synology is the secure front door. A reverse proxy rule takes HTTPS requests for an address like radio.yourname.synology.me. It then passes them to the stream source on your network, using a free Let’s Encrypt certificate.
    • The Alexa skill is tiny and free. As soon as you say the magic words, it simply tells the Echo to play that HTTPS address. Pause, resume and stop work too.
    • It stays private. The skill runs in development mode on your own Amazon account and is never published, and the stream is protected with a secret key in the address.

    What you need

    • A stream on your network that already plays in VLC – MP3 at 128–192 kbps is ideal
    • A Synology NAS on DSM 7 with a synology.me address (or your own domain)
    • Access to your router, so you can forward ports 443 and 80 to the NAS
    • A free Amazon Developer account, signed in with the same Amazon account as your Echos

    The steps in brief

    1. Give the stream an HTTPS address – create a reverse proxy rule on the Synology and get a Let’s Encrypt certificate for it.
    2. Test it from outside – on your phone with Wi-Fi off, the address should show a padlock and play.
    3. Create the skill – an Alexa-hosted Node.js skill, with the Audio Player switched on.
    4. Paste in the code – the interaction model and index.js from the guide, with your stream address and station name.
    5. Enable testing – switch the skill to Development and it works on every Echo on your account.

    The guide covers every screen in detail. It also has a troubleshooting table for the common errors. For example, the Echo might say its intro and then go silent, or a stream might work at home but not on mobile data.

    Handy extras

    • Say anything you like – an Alexa Routine lets “Alexa, put the radio on” open the skill.
    • Play on several Echos – using a room’s Preferred Speakers, since custom skills can’t target speaker groups by voice.
    • Good to know – live streams run 10–30 seconds behind. Also, a 192 kbps stream uses about 85 MB of your home upload per hour, per Echo.

    Keep it personal: a development skill only works on your own account, which is exactly what you want. By contrast, publishing a skill that streams commercial music to the public would need broadcast licences (in the UK, PPL and PRS for Music).

    Get the guide to your own audio stream on Amazon Echo

    Everything – the full walkthrough, the skill code and the interaction model – is free on GitHub under the MIT licence: github.com/axelthefatcat/echo-home-stream.

    More from Dean’s Workbench: a Ready At heat-up planner for my Balboa spa with ESPHome, and Dino’s Discogs Tagger for fixing music tags.